Have a build process to produce a deployable (non-development) package. Host on Linux with pm2 to manage processes and restarts. Move files with rsync. Perform installation activities with ssh. Reverse proxy through nginx for improved performance and SSL termination.
For information about how to build a node.js web application see Building a Web Application with Node and Typescript.
Build a Deployable Package
Step 1 of a deployment process is to build a deployment specific package of your application. The needs of an application in production are very different to the needs during development. For example, a production application does not need all your development npm dependencies, or source maps, or unminified source files.
I use gulp for all my node.js scripting requirements. When combined with shelljs and gulp-shell for executing bash commands from gulp I find it to be an effective scripting platform and a reasonably reliable cross-platform solution (with some exceptions).
My application consists of a node.js server application and a React browser application. The client-side JavaScript is written in many files. For production I would like to concatenate them together to minimize the number of HTTP requests required and improve performance. To do this I use browserify, and a gulp task like this:
gulp.task('concatenate-client-javascript', shell.task([
    'browserify src/app.js -o public/bundle.js'
]));
Browserify starts from the root of the application (app.js) and recursively follows dependencies to build a graph of all the required code. It then concatenates it all into a single file (bundle.js).
To create my deployment package I copy the files that are required for deployment to a separate directory - mine is called package. I do this with simple shell commands executed via shelljs or gulp-shell.
At this point I have a directory package containing my application as I would like it deployed to my server.
Hosting on Linux with pm2
Deploying node.js applications to Linux is a good idea because:
- node.js works better on Linux than on Windows
- Linux is often cheaper
Unfortunately, unlike Windows, Linux does not have a consistent mechanism for implementing servers. pm2 is a process manager that can help with this. To install pm2:
$ npm install pm2@latest -g
Instead of starting our application directly like this:
$ node app.js
We use pm2 to host the process:
$ pm2 start app.js
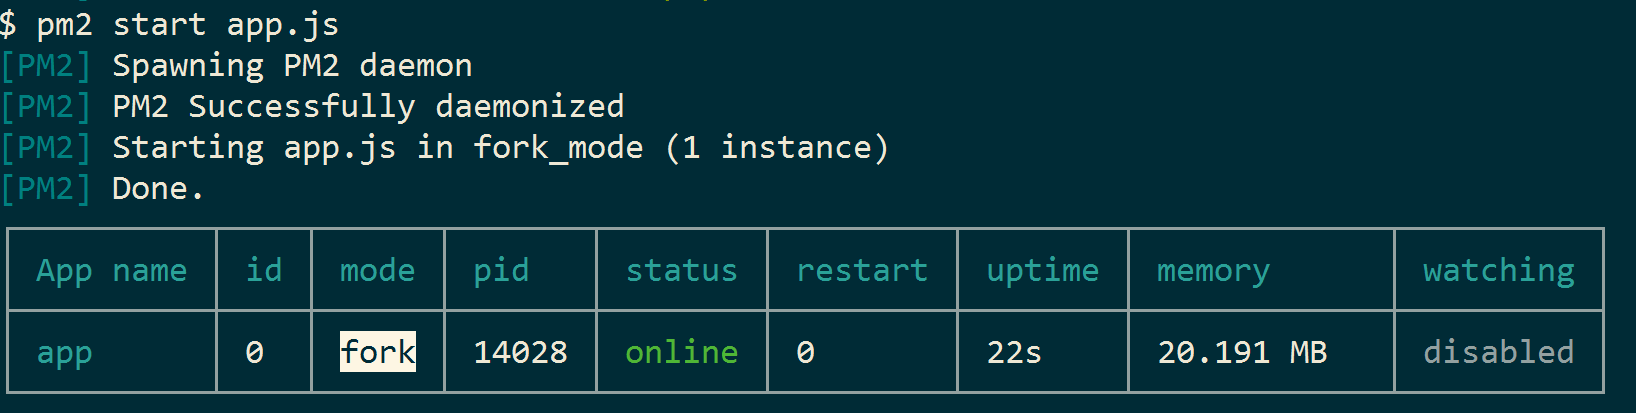
pm2 immediately provides a number of benefits:
- it restarts the process if it crashes
- it handles logging
- it is able to manage many processes and control things like starting, stopping, memory use and uptime
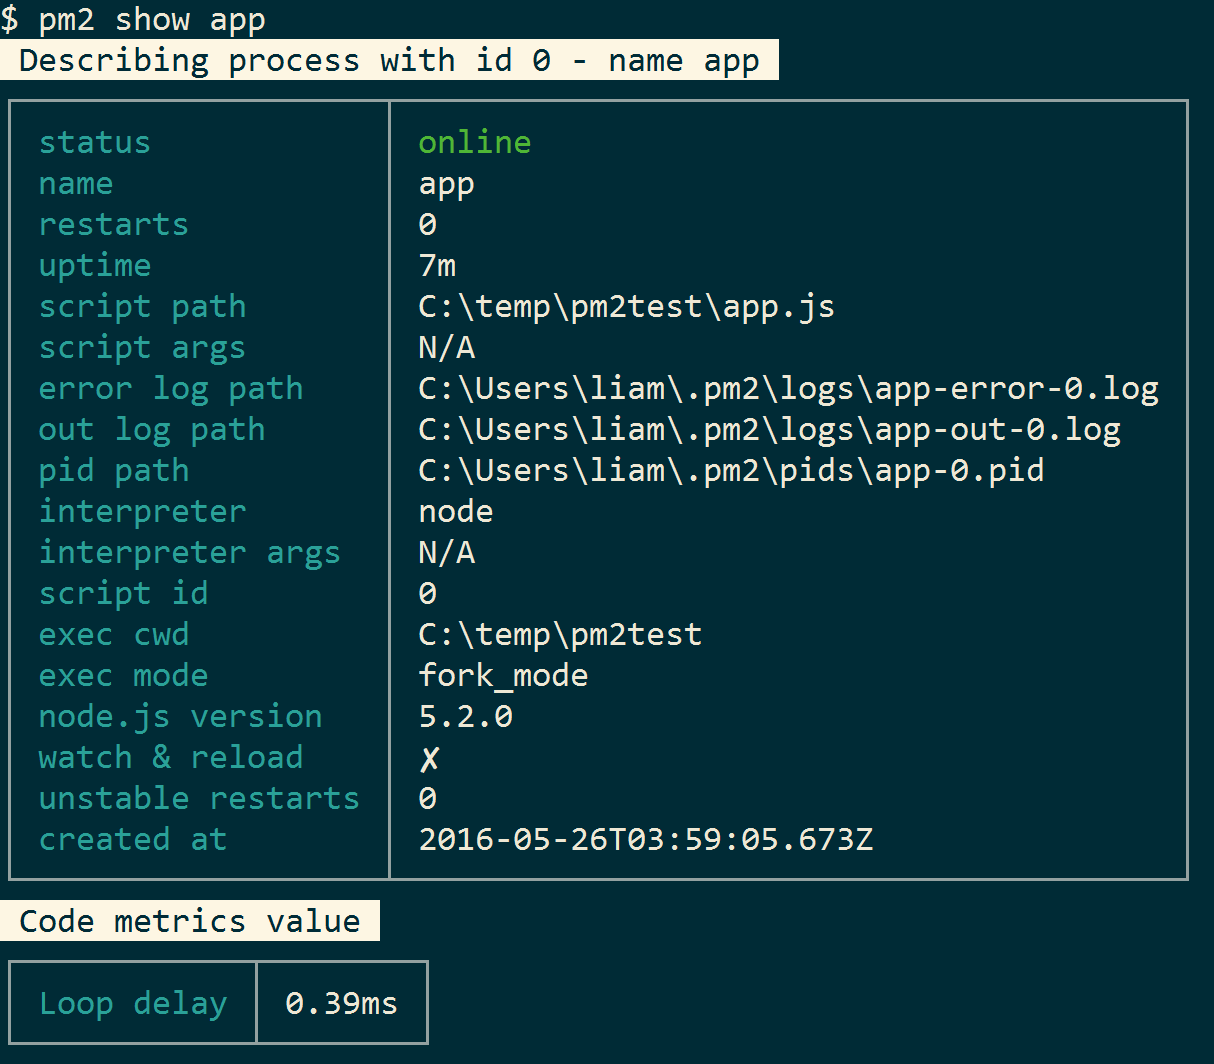
Detailed information about a process is retrieved with the show command:
$ pm2 show app
pm2’s real party trick is that it can be configured to start with the operating system. To do this, first save the current process list then use the startup command:
$ pm2 save
$ pm2 startup
The output will be a shell script to be executed as root that will cause pm2 to start when the OS boots and start its processes. Unfortunately, this does not work for Windows.
Now we have a way to run our application, we just need to move the files to our server.
Move files with rsync
rsync is a smart file synchronization tool that can be used to move your application from your development computer to your deployment server. By using delta encoding and compression rsync optimizes file transfer size and speed.
Again, this is easily scripted with gulp.
gulp.task('deployapp',['package'], shell.task([
  "rsync -azvP package username@yourdomain:location/to/deploy/to",
]));
This gulp task will copy our application directory (package) to ~/location/to/deploy/to relative to the user’s home directory. You will obviously need to authenticate with the server to do this, which can be done with certificates or a password.
Perform Installation Activities with SSH
With SSH we can run bash commands on a remote computer. For my application the post install steps are:
- Delete the database
- Restart the application process with pm2
My gulp task is something like:
gulp.task('postinstallsteps',['deployapp'], shell.task([
  'ssh username@yourdomain "rm -f mydatabasefile.db && pm2 restart myapplicationname"'
]));
For more complicated scripts you can use SSH to execute a script file:
$ ssh username@yourdomain 'bash -s' < myinstallscript.sh
Reverse Proxy Through nginx for Improved Performance and SSL Termination

nginx is a wonderful web server and proxy that handles most of the world’s web traffic. When hosting a node application we can chose to let clients connect directly or via a reverse proxy, such as nginx. nginx is much better than node.js at certain tasks, such as proxying, serving file system content and terminating SSL.
I use the default ubuntu setup of nginx, which uses a file-per-site in /etc/nginx/sites-enabled to configure nginx. My nginx configuration file is included in my deployment package as a text file, similar to:
upstream app_demo_blackstar {
    server 127.0.0.1:2999;
}

# the nginx server instance
server {
    listen 80;
    server_name demo.blackstarcms.net;
    access_log /var/log/nginx/demo-blackstarcms.log;

    # pass the request to the node.js server with the correct headers and much more can be added, see nginx config options
    location / {
      #proxy_set_header X-Real-IP $remote_addr;
      #proxy_set_header X-Forwarded-For $proxy_add_x_forwarded_for;
      #proxy_set_header Host $http_host;
      #proxy_set_header X-NginX-Proxy true;

      proxy_pass http://app_demo_blackstar/;
      proxy_redirect off;
    }

    location ~* ^.+\.(jpg|jpeg|gif|png|ico|css|zip|tgz|gz|rar|bz2|doc|xls|exe|pdf|ppt|txt|tar|mid|midi|wav|bmp|rtf|js)$ {
      root /path/to/static/content;
    }
 }
The server element defines a website at http://demo.blackstarcms.net on port 80.
The proxy_pass setting configures nginx as a reverse proxy for the upstream application app_demo_blackstar, which is my pm2 hosted node.js application.
The location setting configures nginx to directly handle any requests for the listed file types. These requests will be handled by nginx and never forwarded to node.js. This improves performance and takes load off the node.js process.
A problem remains - my nginx configuration file is in my application deployment package, but needs to be in /etc/nginx/sites-enabled to be picked up by nginx. This is easily solved by creating a symbolic link in /etc/nginx/sites-enabled:
 $ cd /etc/nginx/sites-enabled
 $ ln -s /path/to/app/package/nginx.config blackstarnginxconfig
Nginx will only reload configuration when it is restarted, like so (on ubuntu):
$ sudo service nginx restart
To pick up nginx configuration changes automatically we could easily add this nginx restart step to our post install ssh commands.
Summary
With this setup in place I can deploy my application with a single gulp command. If my application crashes the output is logged and the application is restarted. If the server crashes my application is restarted when the server restarts.